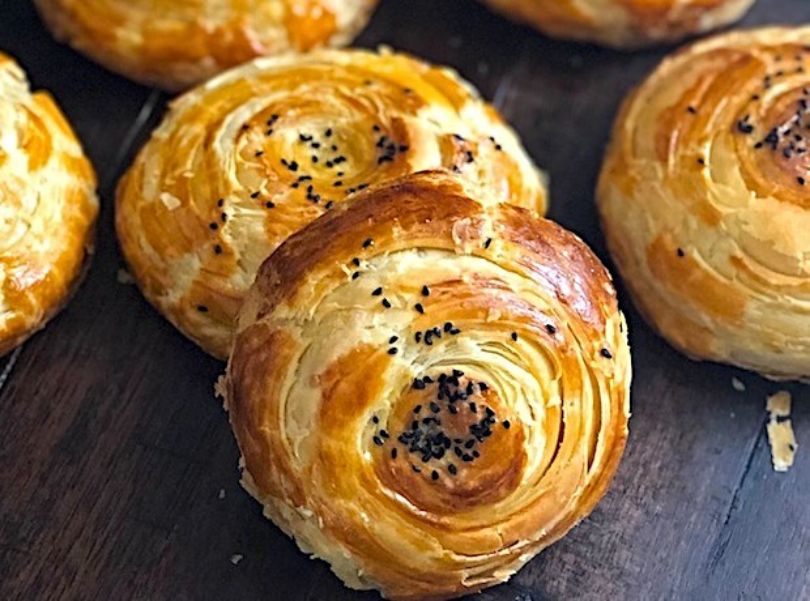
Here is the recipe for the favorite sweet-savory pastry of Azerbaijani cuisine
Makes 12 to 18 breads (depending on size)
Ingredients
For the Dough:
1 package (¼ ounce / 2¼ teaspoons) active dry yeast
1 cup warm water (105Р ›РЎ™–110Р ›РЎ™F)
6 cups all-purpose flour, plus extra for kneading
2 teaspoons salt
1 cup milk, at room temperature
1 large egg, at room temperature
7 ounces clarified butter (ghee) or unsalted butter, melted and cooledFor the Spice Filling:
2 tablespoons fennel seeds
2 tablespoons cumin seeds (can substitute anise seeds)
½ teaspoon turmeric
1 teaspoon salt
¼ teaspoon ground black pepper
2 cups all-purpose flour
4 ounces clarified butter or unsalted butter, melted and cooled
For the Butter Spread:
About 18 ounces clarified butter (ghee) or unsalted better, melted and cooled (clarified butter is preferred for better taste)
For the Top:
2 large egg yolks
1 tablespoon Nigella sativa seeds (can substitute poppy seeds)
Directions
Step 1 – Prepare the Dough:
In a small bowl, dissolve the yeast in the warm water and let stand until frothy, about 10 minutes. Sift the flour into a large mixing bowl. Add the salt and mix well. Make a well in the center and add the yeast mixture, milk, egg, and butter. Stir with your hand to incorporate the ingredients.(Would you like to make this dish together? Join our Cooking Masterclasses to learn and taste the national cuisine of Azerbaijan!)
Scrape the dough onto a lightly floured surface and knead until smooth and elastic and not tight, about 10 minutes. If the dough is still sticky, add more flour and knead but do not overdo it with the flour. Put the dough back into the large mixing bowl, cover with a kitchen towel or plastic wrap, and let rise in a warm spot, until it doubles in bulk, about 1 1/2 hours. The dough will be puffy and soft when poked with a finger.
Step 2 – Prepare the Spice Filling:
Toast the fennel and cumin seeds (or anise seeds) on a hot skillet for about 2 minutes, until their aroma rises (toasting will intensify their aroma and flavor). Grind the spices in a spice grinder or with a mortar and pestle. In a medium mixing bowl, combine all the ingredients for the filling except the butter. Stir to mix. Gradually add the melted butter and rub with your fingers until you obtain fine crumbs. Set aside.
Step 3 – Prepare the Butter Spread:
Melt the butter and set aside to cool.
Step 4 – Prepare the Baking Sheets and the Work Surface:
Have 2 large baking sheets ready. You will need a large work surface divided into two sections: one to roll out the dough and another to assemble the layers. Sprinkle some flour onto one half of the work surface on which you will roll out the dough. Generously oil the other half of the workplace (or sprinkle with flour, too).
Step 5 – Prepare the Dough Layers:
Shape the risen dough into a log and divide into 9 equal pieces. Shape each piece into a ball. Work with one ball at a time and cover the rest with a kitchen towel.
Using a thin, long rolling pin, roll out one ball into a 20-inch circle that is about 1/16-inch thick. When you roll the dough, from time to time sprinkle it with flour and spread all over the circle to prevent it from sticking to the rolling pin and for easier rolling. Wrap the rolled-out circle around the rolling pin and unwrap on another side of the work area.
Drizzle 5 to 7 tablespoons (be generous) of the butter spread onto the circle and spread over the circle with your hand. Roll out the second dough ball and place on top of the first layer. You can roll it out into a smaller circle. Now, with your hands, hold the edges of the second layer and very gently stretch in all directions (first one side, then the other, etc.) to fit the bottom circle, then stretch them together until a large rectangle is obtained (rectangle will be easier to cut into equal-size strips at a later stage, but it is not mandatory – circle is ok too). Continue rolling up the remaining dough balls in the same fashion, placing them on top of each other, brushing with butter (except the final layer, which should not be buttered), and stretching with your hands. Again, roll the subsequent balls smaller that the first one – you will stretch them after you have placed them on the previous buttered layer.
Each stretched layer should be almost see-through (see photo below). Take care not to tear the layers when you stretch them, but should this happen, do not worry – leave them as is or try to patch them if you can with pieces of dough.
Once all the layers are ready, gently pull the sides of the layered rectangle to stretch as far as it can go. The thinner and wider the layers, the flakier the breads will be. Ideally, you can obtain a rectangle about 20 by 26 inches. If your rectangle is smaller, it’s ok too.


Step 6 – Stuff and Shape the Breads:
Next, using a sharp knife, cut the layered rectangle along its shorter side into 2 1/4-inch-wide strips. For smaller breads, cut shorter strips along the longer side of the rectangle.
Slightly stretch each strip lengthwise (this will make the layers thinner and the bread flakier), then beginning from one narrow side, gently roll it into a tight roll-up.
Leave the roll-ups aside to rest for 10 minutes.
Take the roll-up in your hand, one of the layered sides up. Either press the end of the strip onto the side of the roll-up to seal it or bring it right into the center of the top layered side and press down with your index finger to “insert” it into the roll-up, creating a hole in it, but only halfway through. Now, using your fingers, begin pushing away from the center of the roll-up to the sides to hollow it out (it should look like a mushroom cap). While you do this, remember to leave the bottom half of the roll-up intact (the layers should be distinct).
With a spoon, fill the hole with 1 1/2 to 2 tablespoons of the spice filling, packing it gently. Bring the edges of the open end of the bread together and seal to close. You will obtain a stuffed bread.
Place the bread on a flat surface, sealed side down, and press gently with your hand to flatten it into a 4 to 4 1/2- inch disk, depending on preferred size.
Continue with the remaining roll-ups in the same manner and place them on the baking sheets, spacing them at least 1 inch apart.


Step 7 – Bake the Breads:
Preheat the oven to 360Р ›РЎ™F. Brush the tops of the breads with the egg yolks and sprinkle with Nigella seeds.
Bake for 40 minutes, or until golden on top, switching the pans halfway through. Remove from the oven. Allow to cool completely before serving.


Step 8 – Store the Breads:
Keep the breads in a large covered container, such as a lidded saucepan for about a week. Otherwise, freeze in ziplock backs. When ready to use, defrost at room temperature and, if desired, heat briefly in the oven to bring back the freshness.
Nush olsun! ( Bon Appetit! )